

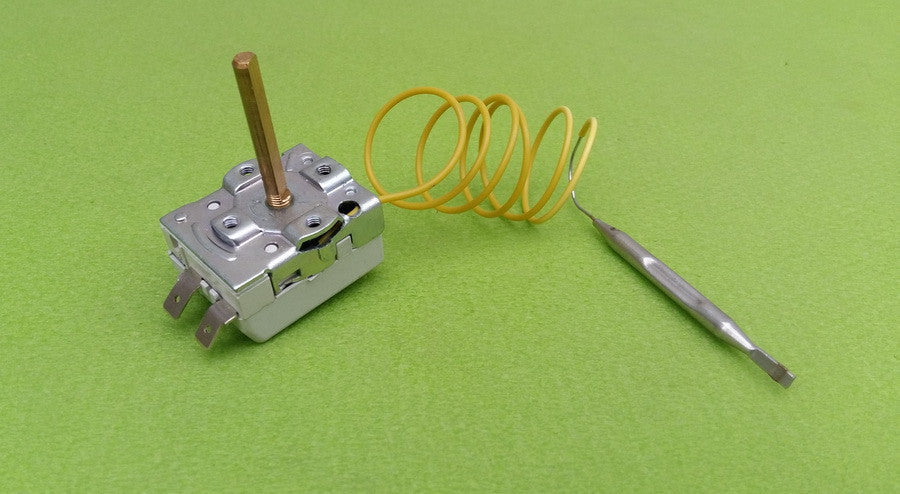
Thermostat capillary NT-122 / Tmax = 80 ° C / 16A / 400V / L = 70cm / H = 40mm rod (2 pins) Tecasa, Spain
Regular price
$48.00
$42.00
13% OFF
Buy online now for free fast shipping worldwide!
The thermostat capillary mechanical NT-122 AVC / T85 (tecasa ) with 2 contacts maximum temperature mode Tmax = 80 & deg; C . Maximum permissible thermostat load current 16A . The operating range of the thermostat temperature from 7 to 80 & deg;. C. Temperature controllers of the type used in some models of the existing boiler, and may also be used in . any other conditions for maintaining a predetermined fluid temperature in each vessel
temperature range: 7 - 80 C
voltage - to <. 400 V
DisHeating elementce between the holes of fasHeatering - 28mm
Height handle-bar (of mounting bores) - 40mm
Total capillary length - 70 cm
Length-tip flask capillary - 7cm
Diameter bulb-tip capillary - 6 mm
Manufacturing - Tecasa, Spain . The total length of the capillary - 70 cm
Length-tip flask capillary - 7cm
Diameter bulb-tip capillary - 6 mm
Manufacturing - Tecasa, Spain . The total length of the capillary - 70 cm
Length-tip flask capillary - 7cm
Diameter bulb-tip capillary - 6 mm
Manufacturing - Tecasa, Spain .
Condition is New.
installation guide for the NT-122 thermostat in English
Note: While I can provide a general installation guide, it's crucial to always refer to the specific instructions provided by the manufacturer. Electrical work can be dangerous, so if you're unsure about any step, consult a qualified electrician.
Installation Guide for NT-122 Thermostat
Safety First:
- Turn off the power: Before starting, always switch off the power at the circuit breaker.
- Use the right tools: Ensure you have the necessary tools, including a screwdriver, wire cutters, and electrical tape.
Materials Needed:
- NT-122 thermostat
- Screwdriver
- Wire cutters
- Electrical tape
- Wire connectors (if necessary)
Steps:
- Turn off the power: Locate the circuit breaker controlling the power to the thermostat and switch it off.
-
Remove the old thermostat:
- Unscrew the mounting plate from the wall.
- Carefully disconnect the wires from the old thermostat. Take note of the wire colors and their connections.
-
Prepare the new thermostat:
- Consult the wiring diagram provided with the NT-122 thermostat.
- Strip about 1/2 inch of insulation from the ends of the wires.
-
Connect the wires:
- Connect the wires to the new thermostat according to the wiring diagram. Typically, wires are color-coded:
- Black or red: Usually the live wire
- White: Neutral wire
- Green or bare copper: Ground wire
- Ensure the connections are tight and secure.
- Connect the wires to the new thermostat according to the wiring diagram. Typically, wires are color-coded:
-
Mount the thermostat:
- Place the thermostat on the wall and align the mounting holes.
- Secure the thermostat to the wall using the screws provided.
-
Turn on the power:
- Switch on the circuit breaker.
- Test the thermostat to ensure it's working correctly.
Tips:
- Label the wires: If you're unsure about the wire connections, label them before disconnecting the old thermostat.
- Use wire connectors: For a neater and more secure connection, use wire connectors.
- Check for compatibility: Ensure the NT-122 thermostat is compatible with your heating or cooling system.
- Consult a professional: If you're uncomfortable with any part of the installation process, consult a qualified electrician.
Additional Notes:
-
Specifics: For more specific instructions, always refer to the user manual provided with the NT-122 thermostat.
- Local regulations: Ensure you comply with local electrical codes and regulations.
Visual Guide:
Remember: Electrical work can be dangerous. If you're unsure about any step, consult a qualified electrician.
Would you like me to add anything else to this guide, such as troubleshooting tips or information on different types of thermostats?
Please note: This is a general guide and may not cover all specific scenarios. Always prioritize safety and consult the manufacturer's instructions.
people are currently looking at this product
Guaranteed Safe Checkout
